
The renko chart trading strategies and trade setups have been consistently profitable, and I have been using the renko chart and price bar chart combination for my position trading and day trading.
But how frustrating is it to get a renko chart price envelope reverse that becomes very profitable, but never have an actual renko trade setup to use for entry?
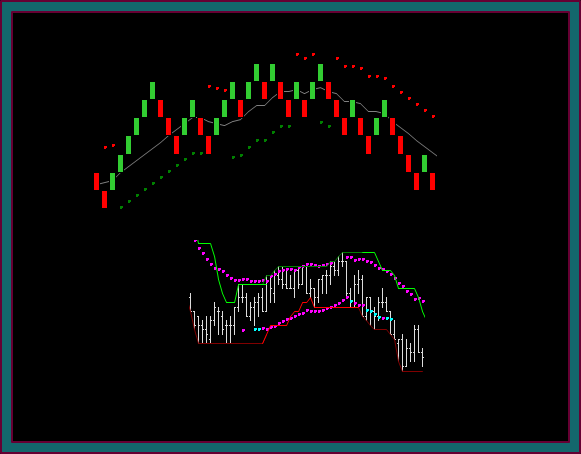
You can see a good example of this on the chart you are looking at – from the yellow circle to the swing high is a $670 move. Although there are also 2 of the renko reverses only that were losers, which were avoided – along with a renko trade setup winning trade that was done.
So, what renko trading strategy could be used to trade the yellow circle swing, without trading all of the renko price envelope reverses?
Renko Chart Discretionary Trading
As one answer to this question, you have heard me discuss the idea of using trade filters for avoiding consolidation trading, and then trading the renko price envelope reverses.
We will work on renko chart discretionary trading, like the chart you are looking at.
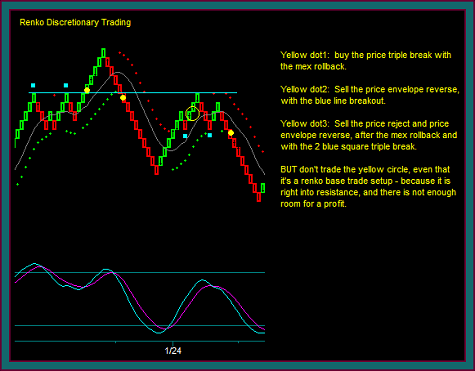
- Yellow dot1: buy the price triple break with the mex rollback
- Yellow dot2: sell the price envelope reverse with the blue line breakout
- Yellow dot3: sell the blue line price reject then price envelope reverse, after the mex rollback and with the 2 blue square triple break
And ironically, but completely consistent with our trading method and profit components – don’t buy the yellow circle, which is the only renko base trade setup on the chart, because it is right into resistance and there is not enough room for a profit.
But before we go further with renko chart discretionary trading, I want to continue to focus on the renko base trade setups and feel confident that everyone is identifying and trading those profitably.
Multiple Renko Brick Combinations
What Is Trading Chart Synch?
Multiple trading charts are in synch when there is an initial reverse on one chart and a trade setup on the other. As we have discussed in our multiple chart type trading videos, there can be synch between a renko chart and a bar chart.
There can also be chart synch using 2 renko charts of different brick sizes, which could still synch with the bar chart – I will continue to stress that our renko trading strategies are best traded by also including a bar chart.
And that’s what we would be using for our renko trading strategy chart layout, especially for day trading – 1 bar chart and 2 renko brick charts.

What would be the benefit for using 2 renko brick sizes, with a price bar chart?
- A slower renko brick size will hold an extended swing longer – where a brick that is too fast, will give meaningless price envelope reverses on smaller retraces
- A faster renko brick size will give additional red-green-red or green-red-green brick patterns for entries, addons, and profit taking – that the slower brick won’t show
We must have chart synch to trade this way, or we will always be 2nd guessing our chart reads – is it ok this time to trade brick2, even though brick1 shows a different direction. Or is it ok this time to trade brick1, even though the bar chart shows a different direction.
This would be the hardest kind of discretionary trading you could do, and would certainly remove the clarity we are trying to gain from trading renko chart strategies.
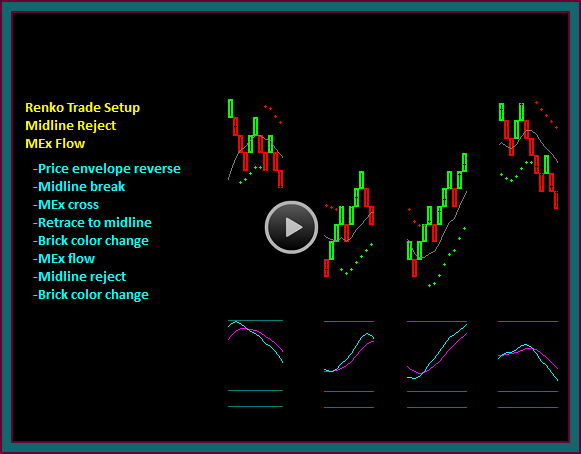
You have been looking at a ‘text book’ example of what I want from a 2 renko charts with different brick sizes, along with a bar chart:
- The bar chart shows a swing reverse
- The slower renko brick chart shows a price envelope reverse
- The faster renko brick chart shows 2 entry setups at the yellow dots, especially yellow dot2 which needs no additional trade read
- I am fine with yellow dot1 if the blue line or yellow line can be seen from the bar chart and left of these charts, as a relevant price
- Consider the yellow line as left side resistance that shifts back to resistance and rejects with mex flow
- Consider the blue line as a focus line that gives a break2 with mex flow failure
- I am fine with yellow dot1 if the blue line or yellow line can be seen from the bar chart and left of these charts, as a relevant price
Without the renko brick2 chart, this entire swing would have been missed – and there is nothing discretionary about the trades that were taken, because the charts being used are synched.
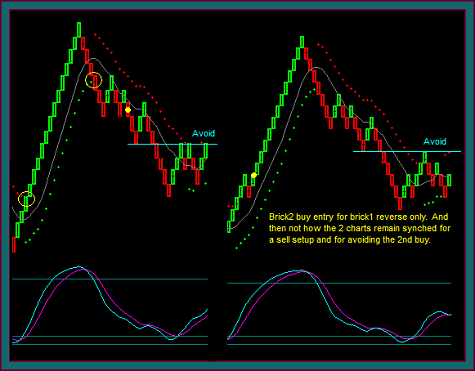
You are now looking at the renko chart that we began the video with, but you are looking at it paired with as a renko brick1 and renko brick2 chart combination – note that there is synch with the price bar chart, but no trade setups at either of the yellow circle price envelope reverses.
- Yellow circle1 is the missed $670 buy swing, because there was no trade setup – however, most of the swing was available because the renko brick2 gave a base setup at the yellow dot.
- Yellow circle2 is the price envelope reverse – and there is only a price envelope reverse on renko brick2
- But the yellow dot is a renko setup, as a midline reject with mex flow-renko brick triple break combination
- You can see a similar setup on the renko brick2 chart – so there is chart synch
- Price envelop reverse3 not only has no trade to take, but shows a trade to avoid because it is directly into resistance – additionally, even though there is a price envelope reverse, at this point continue to hold the yellow dot sell.
The 2 renko brick charts are the next step for our renko trading and chart synch strategies. And this is what I want to develop and discuss further, before getting into the more discretionary decisions, like the chart I showed.
Will using the 2 renko brick charts keep us from not missing any of the extended price envelope reverse only swings? Unfortunately not – but it will decrease the amount of times that happens, while also giving some addon setups that we wouldn’t have otherwise had.
Be the first to comment