Renko Charts

Renko Chart Trading Method Consistency And Repetition

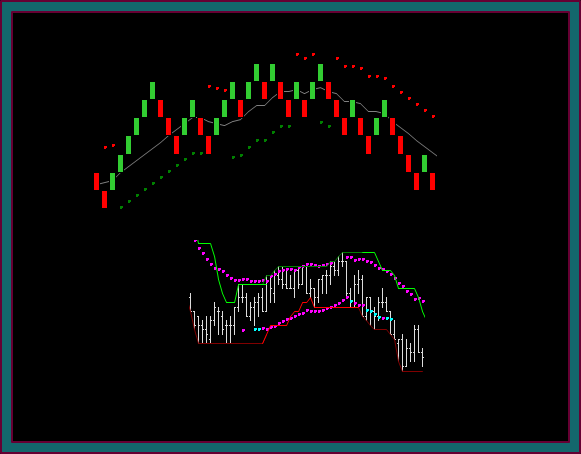
Renko charts trading patterns and setups consistently and clearly repeat, making them effective for usage in a trading method. And then by using a tick chart for confirmation of price location, momentum strength, and market conditions – the renko chart strategies profitability and winning percentage can be further increased.

[…]

Renko Charts

Renko Trading Strategies – Renko Chart Brick Combinations

We have discussed renko chart trading and the combination of a renko chart with a price bar chart. In this video we are going to add a 2nd renko chart with a different brick size to the combination. Why – in an attempt to eliminate some of the extended price envelope reverse swings that don’t give a renko trade setup for entry.

[…]

Trading Method Strategies

Renko Trading Strategies Base Trade Setup

Renko trading strategies reference video that discusses and defines our renko base trade setup and the 4 required components: (1) price envelope reverse (2) reject-reverse brick pattern (3) midline reject (4) mex flow. Additionally discussed is the importance for the distinction of base setup.

[…]

Trading Method Strategies

Price Action Price Trading And Identification

Price action prices are chart price areas that are important for trading, because they have tested and rejected as support and/or resistance multiple times. This video will discuss 2 price action prices that were used to avoid losing trades, as a price failure entry for a winning trade, and as a partial profit target.

[…]

Renko Charts

Renko Trading Strategies And Chart Combinations

Renko trading strategies video that primarily focuses on: (1) how the renko trade setups are traded more profitably, when they are synched with a price bar chart (2) how the renko-bar chart strategies have been integrated into our method, by discussing the specific charts shown in the context of day trading – and as if they were used for stocks and options position trading.

[…]

Renko Charts

Renko Charts Trading And Trade Management

Renko charts trading video that reviews a series of trades, with the focus on trade management and the initial risk and profit targets used – especially in light of the chart being made of the fixed renko bricks, instead of actual price bars.

[…]

Renko Charts

Renko Midline Reject Trade Setup Brick Patterns

This was a good chart for discussing the renko midline reject trade setup, because (1) there were 2 midline reject brick patterns that were not full setups to take the trade (2) there were 2 midline reject brick patterns that were slightly different – but the trades were done because of having very good price continuation components.

[…]

Renko Charts

Renko Price Envelope Reversal Trade Setup

This video continues discuss the renko midline reject setup entry timing. Of particular focus is a trading chart discussion and whether there was any reason not to enter all of the trades on the reverse brick after the midline reject – I also point out 2 trades that I really shouldn’t have taken and why.

[…]

Renko Charts

Renko Chart Trade Setup And Entry Timing

The price envelope reverse midline reject is my favorite renko trade setup and is easy to identify on the chart. But what is not as clear is the actual entry timing – and entering inside an uncompleted brick after the reject -vs- waiting for that brick to complete and begin a new brick.

[…]

Renko Charts

Renko Chart Trading Indicators Parameters And Setup

This renko trading chart video has 2 primary focuses: (1) discussion on the new renko trading indicators parameters and conditions, along with setting these up on the charts (2) general thoughts about the strengths and weakness of the renko charts and how they fit our trading method strategies.

[…]