
Renko charts trading have additional considerations for trade management, due to the renko charts consisting of fixed size price bricks, instead of actual price bars.
So, in this renko chart trading video, besides discussing trades that were done, I especially want to go over the related management of the trades and the initial risk and profit targets that were used.
We are going to first talk about the renko trade setups and management in the context of our trading method strategies, instead of a specific underlying – then at the end of the video I will say what has been traded, along with the renko brick size and price envelope indicator parameters.

But to get started, here is some additional information:
- This is a renko day trading chart
- The chart is for the entire real time hour trading period
- Each renko brick is a $55 value
- Initial trade risk and the first profit target is relevant price related
- An additional bar chart is being used for trading along with the renko chart to better show these prices, and compensate for the renko bricks being a fixed size
- The initial risk is around 3 bricks or $165
- The average loss ends up smaller than this – this is a function of the momentum in the trade setups and the price movement away from the entry, even if it doesn’t go as far as the profit target
- The partial1 profit target is around 4 bricks
- The average first partial profits ends up larger than this – this is a function of our trading strategy for breakout potential and ease of price movement, which is used to extend the profit size
- Additional renko trade management notes
- The renko base trade setups do better than a 50% win:loss
- The average winning trade has more than 1 partial profit
- A number of winning trades will also have a profitable add-on trade that was done
- What begins as a relatively flat risk:reward ratio, ends up considerably better
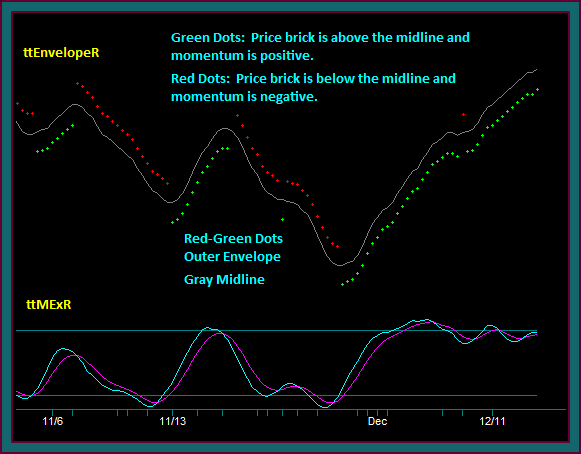
Renko Chart Trades Initial Risk And Profit Target Prices
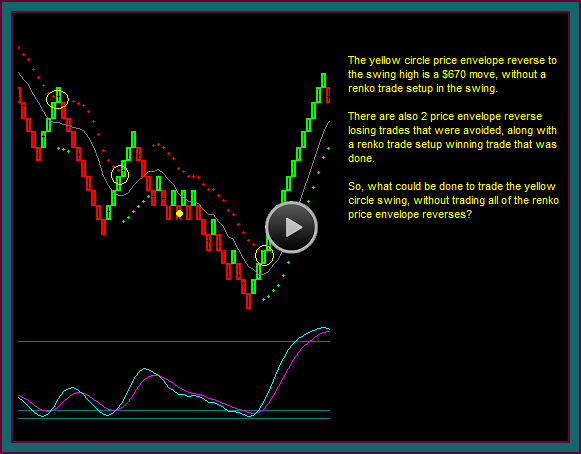
In the video I decided to talk about the first renko trading swing, because there are a lot of different things to discuss for trade setups and trade management – these were 3 contract trades.
There were 3 other trades available – 2 winners and 1 loser, so I am not avoiding covering a losing trading period.
Let’s start by discussing the renko chart prices for initial risk and profit targets. You can see a yellow, blue, and dark cyan line on the chart – these prices came from the bar chart:
- The 2 blue lines were left side price action prices
- Calling them RES:SUP prices means that they were resistance prices that broke and shifted to support – and are now support prices if they are retest
- The dark cyan line was a price inside of the blue chart prices – it was a double bottom into a breakout that traded to the high you can see on the chart
- This price is the first profit target
- The yellow line is a price right above the lower high on the bar chart that synched with the chart reversing into sell
- This price is the initial risk for the trade
- We don’t want to use the actual lower high price, because it will hit too often on a retest
Renko Chart Trades And Management
Yellow dot1: sell to the breakout of the blue line – I entered here because of the renko brick patterns that were part of the trade
- 2 green bricks double high with mex flow down – and then into the 2 purple square triple bottom breakout
- This is an example of what I meant by the trading strategies momentum tending to move price after the trade entry
- Partial profit1 is taken at the first blue square on the break of the target price
- The profit is 5 bricks
Yellow circle1: this is a very good addon setup as a red-green-red renko brick reject of the blue line as resistance, and the midline with mex flow – but I didn’t like the location of the dark cyan line as potential support, so I didn’t do the trade
Yellow dot2: this was now done as an addon, after the ETH SUP break and shift to resistance, and the midline reject with mex flow – this is our renko chart base trade setup, as a price continuation trade
- The yellow line was used as the initial risk area, which would be 3 renko bricks – what was needed was to allow for a retest-break of ETH SUP as resistance stopping out the trade
- The bottom blue line was the target
- With the profit taken on the break of the line
- As an addon trade and the condition of a momentum extreme at the time, along with the strength of this line as chart support – the addon was exited at a profit of 5 bricks each
- With the profit taken on the break of the line
- Additionally, another partial profit was taken on the initial trade – and a profit of 11 bricks
After the move to the low, along with the mex cross and break and hold of the bottom RES:SUP price
- I would have exited the addon at blue square3 if still trailing
- And I would have taken another partial on the initial trade, if I had one to take
- I would also understand someone only trading yellow dot1 and exiting their trade at blue square3, trying to minimize giveback into a potential reverse
- I exited the final contract at blue square4 after the price envelope reverse – trying to give it some room to stay within the price envelope channel and resume the downside price move
- The profit on the last contract was 7 bricks
That ends this renko chart trading and trade management video. So, what was the underlying traded; it was the crude oil future, which along with the emini russell and euro currency is a futures contract that I used the renko charts for day trading.
Be the first to comment